#
Debra Quartermain Design
 Making & Celebrating 
Thursday, November 30 2023

Living in a winter wonderland for five months of the year, been building snowmen all my life. Love designing them too so here is my No Sew Felt Sparkles Snowman or Snowbelle I created for the Team Creative Crafts final blog hop of the year. Want to build a snowman there are so many great ideas to choose from! 
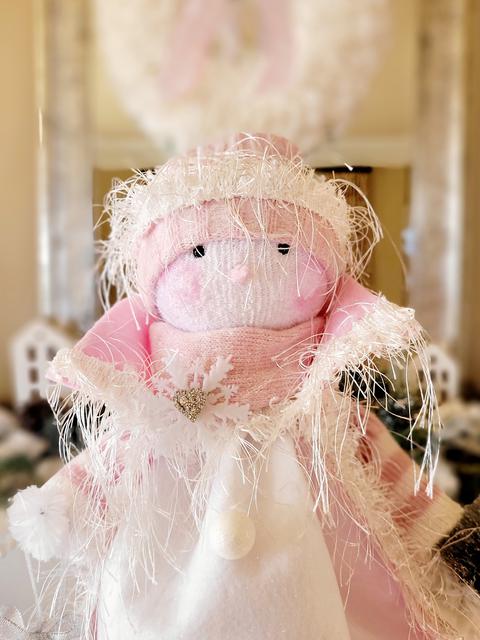
My favourite product to work with is Kunin Felt, their thicker Premium weight is perfect for bigger projects. I also like that it is made from recycled plastic bottles. The felt comes in craft cut sizes and which are also easy to work with. I raided my holiday supplies for fluffy trims, snowflakes and snowballs plus a couple pairs of socks. 
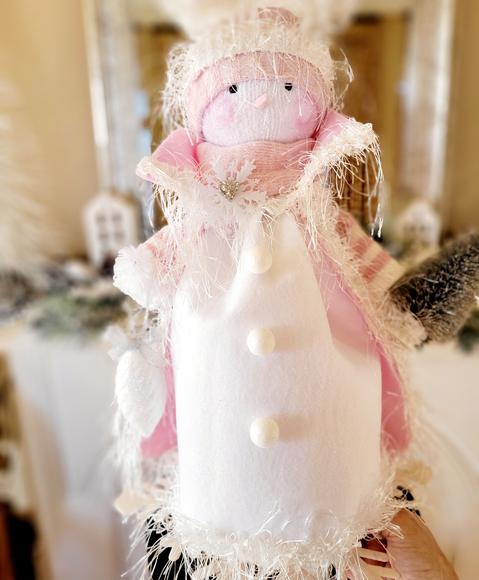
You will need:

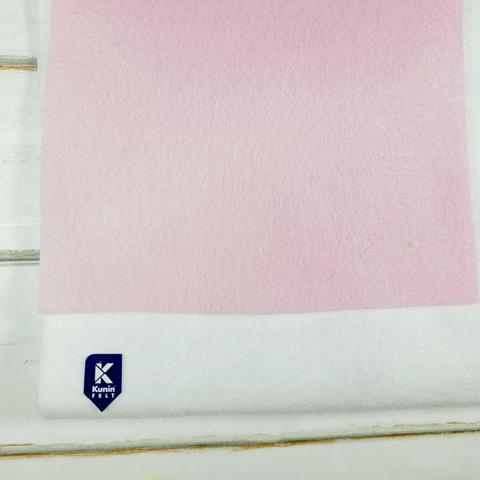
1 yard of Kunin Premium White Felt available at Hobby Lobby, JOANN and Walmart. 
1 bottle of Rit Dye Petal Pink (the white dyes to a soft pink, I use the hot water method, hang to dry. For more vibrant colors use the Rit More product) Dye a 15" by 18" piece for cape
i Pair of white socks and 1 pair of pink
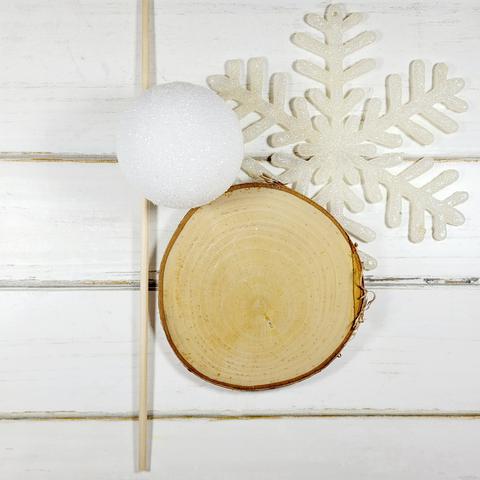
5" Foam ball
12" Dowel
Round wood piece for stand
Large Snowflake
18" White large chenille stem
Mini snowflakes
Mini Snowballs
2 yards Trim, fur or fluffy trim  (I used a trim from Trims by the Yard)
2-4mm Safety eyes of beads
1 yard Narrow white elastic
Needle and thread
Beacon 3 in 1 Adhesive
Hot adhesive
Scissors and pins
Ruler, measuring tape, and pencil
STEP 1

Cut pink socks as shown. The two tops are used for sleeves and the bottom half of one is the hat.
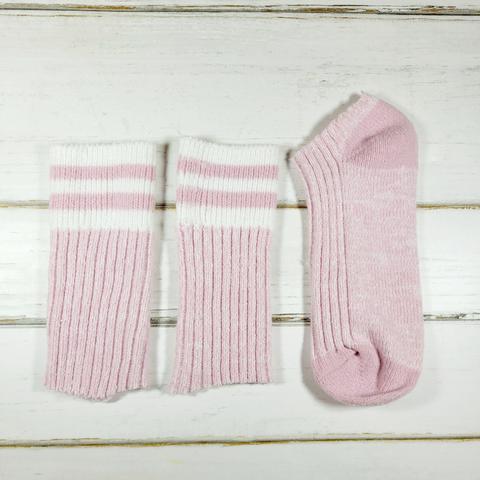
STEP 2

Stretch one white sock over the foam ball. Cut off excess. Insert dowel end into bottom of ball at neck. Glue in place. Insert eyes and blush cheeks.
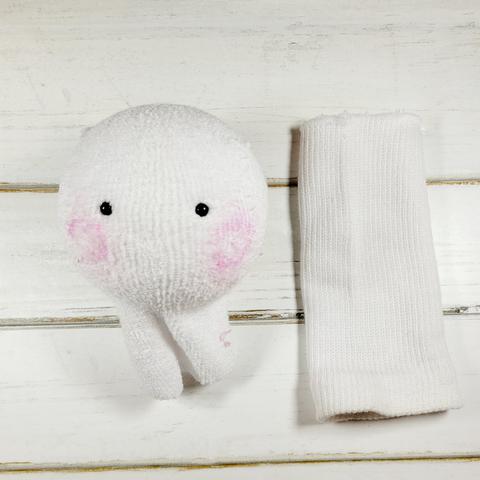
STEP 3

Insert each cuff end over the chenille stem as shown. Bend ends sticking out to form "hands'"
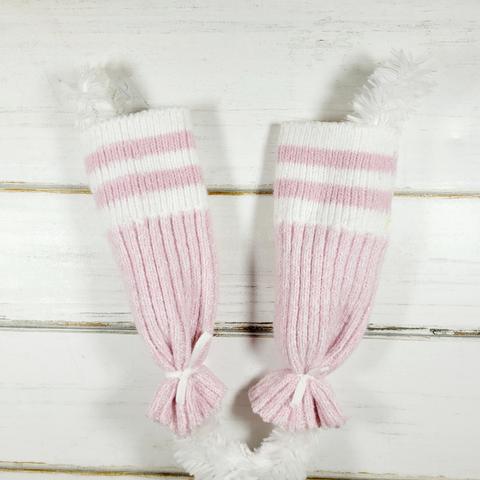
STEP 4

Glue and wrap arms around dowel as shown. Also use a small piece of elastic to tie as well. Press in eye beads and blush cheeks.
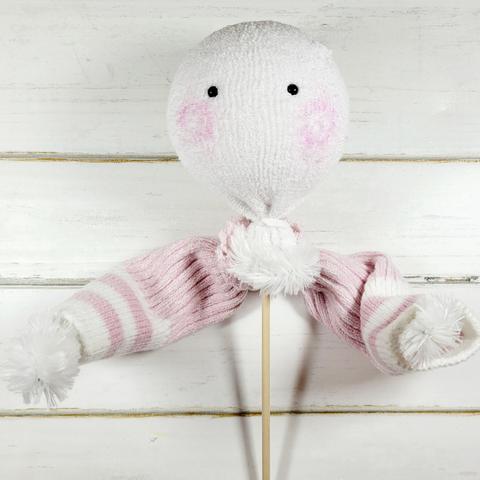
STEP 5

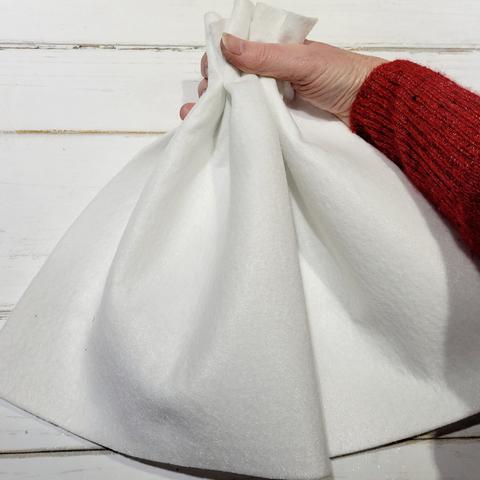
Cut a piece of white 12" by 18" for dress. Add trim to bottom edge. Gather and tie around neck. It does not go all the way around. It fills in the front. 
STEP 6 

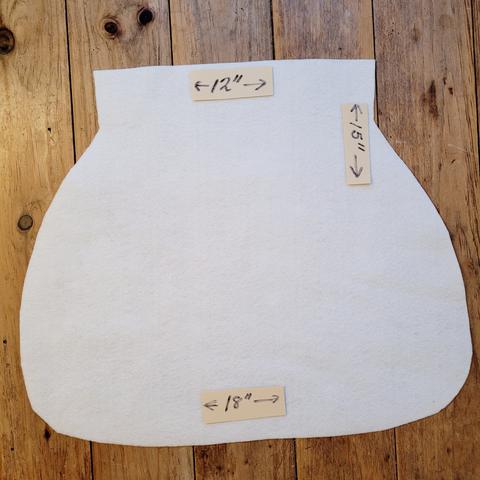
Cut a cape following measurements in photo. Fold in half to make both sides even. 
STEP 7


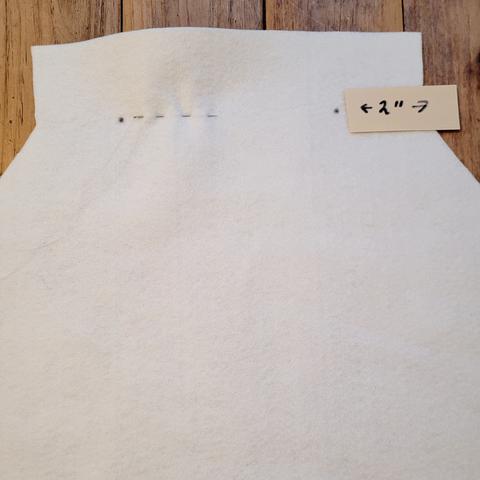
The only sewing in whole project is a gather line in 2" from either end to fit better around the neck. 
Glue on trim around outside edge. 
STEP 8

Pull stitches in cape and try on Sparkles to see where the arm holes should be cut. Cut small slits and insert arms. Tie cape on with elastic and also glue in place. 

For the hat. I simply tied off top of heell of sock and stretched over the head. Glued on trim once in place. Now embellish as you want and dust with fine glitter for extra sparkle. I did a light coat of hair spray first. You can use the rest of the pink sock to create a muffler. 
STEP 8A

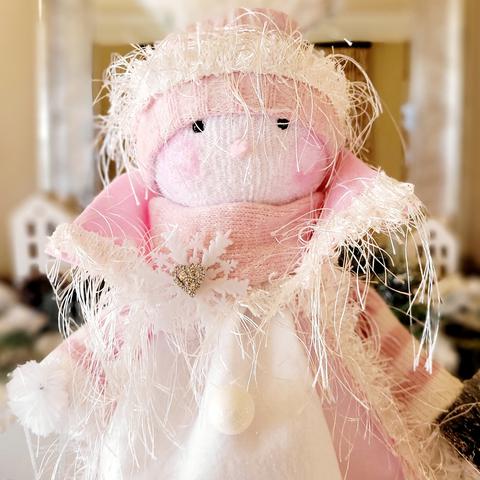
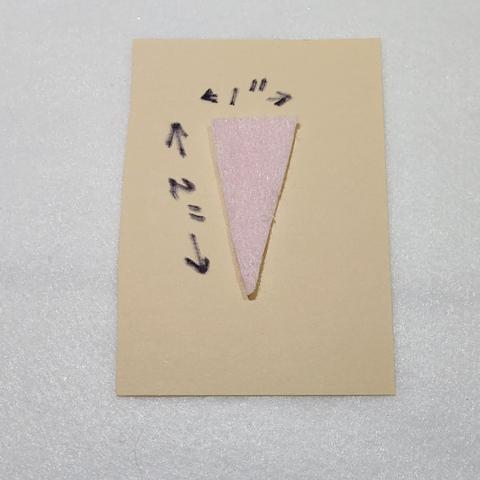
For the nose cut a triangle from pink scrap and roll. Glue and adhere end to face. If too long trim off.
 

STEP 9

I glued the dowel in to a drilled hole in base and glued it on top of a large snowflake for extra stability.  Here she is in my pink themed Parlor this year. 
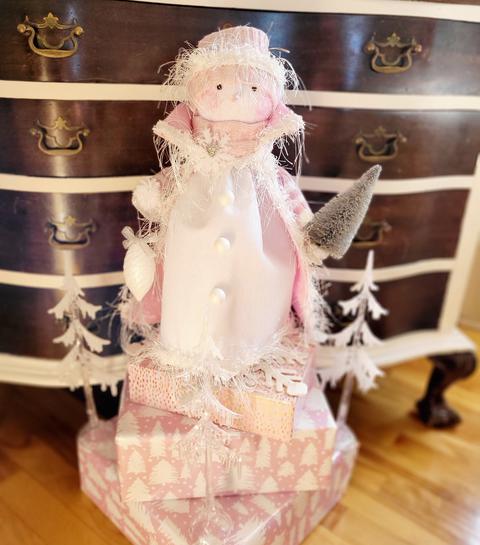
Hope you have been inspired by my No Sew Felt Sparkles Snowman, Snowbelle. Here are more great Snowman Themed Crafts to check out!

Free Printable Snowman Soup Poem from Laura at Me and My INKlings


Dollar Tree Wooden Spoon Snowmen from Beth at Creatively Beth


“Up to Snow Good” Free SVG File from Lindsay at Artsy Fartsy Mama


How to Draw a Snowman from Smitha at Smiling Colors


Snowman Elementary School Worksheets from Justine at Little Dove


Crocheted Snowman Head Ornament from Erica at Five Little Monsters


DIY Snowman Décor from Katie at the Crafty Blog Stalker


Free Printable Snowman Coloring Page from Beth at Creatively Beth


FRIDAY LINKS:


Recycled Champagne Cork Snowmen from Beth at Creatively Beth


Free Printable Snowman Jokes from Lindsay at Artsy Fartsy Mama


Snowman Gift Tag from Laura at Me and My INKlings


No Sew Sparkles the Snowman from Debra at DQ Designs


Snowman Gift Card Jar from Blanca at Creativities Galore


Upcycled Embroidery Hoop Snowman from Beth at Creatively Beth


Posted by: AT 01:33 pm   |  Permalink   |  0 Comments  |  Email
Thursday, July 27 2023

Candy Pink is my favorite Kunin Felt color and apparently Barbie's too! I grew up with Barbies and my mother made me the prettiest clothes. I sewed some myself on my little pink sewing machine. So this Back to School DIY Barbie Bag is extra special, lots of memories and now that love has passed from my daughters to my granddaughters. 

This bag is no sew, easy and only requires two craft cuts of felt! 

YOU WILL NEED:

  • Kunin© Premium™ Felt Craft Cut 12” by 18”– Candy Pink
    Kunin© Classic™ Felt Craft Cut 9” by 12”– Fuchsia
  • 2 yards of Ribbon
  • Velcro Dots
  • Beacon Fabri-tac or Hot Glue
  • Scissors – Regular and Detail
  • Measuring tape, clips
  • 1 yard Pom Pom Trim

1. Cut Fuchsia piece in half lengthwise.

2. Glue one Fuchsia piece along edge of Candy Pink.

3. Fold Fuchsia piece over and line up with glued edge on opposite side. Glue in place. 

4. Fold up Candy Pink 8" from bottom as shown. Glue both sides to create bag. 

5. Glue trim along top edge and lower edge as shown. 

6. Measure ribbon to desired length. Glue inside as shown. Glue on Velcro dot. 

7. Embellish and personalize as desired. Quick and easy, hope you have been inspired to create your own Back to School Barbie Bag. Makes a great clutch too. Fun project for a kid's party!

If you enjoyed this Back to School Bag, you can find my Mini Tote I designed for Kunin Felt here

Check out the link on my Home page for more great Back to School projects with Team Creative Crafts! 

Making and Celebrating Heart, Home and Holidays!

How to Bake Rainbow Stack Cakes from Laura at Me and My INKlings

 Back to School Color By Number Free Printable from Lindsay at Artsy Fartsy Mama

 Clay Pot Apple for Teacher Craft from Beth at Creatively Beth

 Free Printable Back to School I-Spy Game by Laura from Laura’s Crafty Life

 How to Make a Cover for a Spiral Notebook from Smitha at Smiling Colors

 DIY Custom Composition Books for Back to School from Justine at Little Dove

 Crocheted Shark Pencil Bag from Erica at Five Little Monsters

 Back to School DIY Barbie Bag from Debra at Debra Quartermain Designs


Posted by: AT 06:16 pm   |  Permalink   |  0 Comments  |  Email
Wednesday, June 28 2023

This week all about Harry Potter Inspired Crafts with Team Creative Crafts! I have always loved owls and so here is my DIY Hedwig Inspired Plush Felt Owl Stuffie. Kunin Brand Plush Felt is perfect to make stuffies and softies! Link to Team Creative Crafts here.
 

Quick and easy, basically a couple of circle shapes, simple stitches. Let's make some magic!

You will need:

1/2 yard of Kunin Felt Brand White Plush Felt (available at Hobby Lobby.)
Fairfield World Poly-fil
2 eye beads or safety eyes, 8mm
Scraps of Kunin Felt Classic yellow, black
Adhesives Beacon Fabri-tac, hot glue both work well
OWL PATTERN
14-15" Circle Template
Embroidery needle and black floss
Needle and strong white thread, scissors and marker

STEP 1:

Use a large plate, wreath form or embroidery hoop to cut out a 14-15" circle from white plush.

Fold Circle in half and trim 1" as shown to create a more oval shape.

STEP 2:

Use thread doubled to hand sew a running stitch around the circle.

STEP 3:

Pull stitches into an open circle shape and stuff. Pull stitches tight and secure. Repeat for head circle.

STEP 4:

Print and cut out pattern pieces. Use an overcast stitch to secure white felt face to front of head circle. 

STEP 5:

Secure thread at back of head and bring through to front for eye placement. Refer to photo. Bring needle through yellow eye circle then the bead. Go back through head and pull stitch tightly to indent eye. Take a couple of stitches to hold eye in place. 

Repeat for second eye. Secure stitches at back. Glue on beak. NOTE: Plush felt has a nap. Gently shape body into oval with hands and place with nap running down. 

STEP 6:

Stitch back of body completely shut if there is an opening. 

STEP 7:

Use black embroidery floss to stitch a wing pattern as shown on the white felt wings. Make sure they face each other as shown. Glue a plush felt wing half to the underside of each wing. 

STEP 8:

Glue head to top of body. Apply a generous amount of glue and hold. (It soaks in to white plush felt a little more than the regular felt.) Glue wings to side of body at top as shown in photo.

Ta da! Your DIY Hedwig Inspired Plush Owl Stuffie is finished. Older kids can make this project and it is a a perfect room decor piece.  Want to make more stuffies like this, check out the Amigurumi Style Chicken here and my granddaughter made a bunny from the same plush felt circle. Get creative and create a menagerie!

Thanks for coming by! Check out all the other HP inspired projects today, links below! 
Heart + Hands Create Magic!

15 Minute DIY Harry Potter Wizard Wands from Beth at Creatively Beth


Dark Mark Earrings from Lindsay at Artsy Fartsy Mama


Harry Potter Painted Rocks to Spread Magic from Laura at Me and My INKlings


Free Printable Harry Potter House Crest Bookmarks from Liz at Liz on Call


DIY Hedwig Owl Plush Stuffie from Debra at Debra Quartermain Designs


How to Make a Harry Potter Inspired Coffee Sign from Blanca at Creativities Galore


Free Harry Potter Color by Number Printables from Heather at Homemade Heather


Harry Potter Free Printable Potion Labels from Laura at Me and My INKlings


DIY Cornish Pixie Jars with Printable Tags from Beth at Creatively Beth


Stenciled Muggle Quote from Lindsay at Artsy Fartsy Mama


Posted by: Debra Quartermain AT 09:34 pm   |  Permalink   |  0 Comments  |  Email
Tuesday, May 30 2023


This month hopping with the Team Creative Crafts, (Link on Home Page) and this month is Ocean Themed Crafts!  I am sharing some of the Ocean inspired decor I created for my granddaughter's nursery. They live on Prince Edward Island, Canada surrounded by the ocean. Our family grew up by the ocean. Special memories and times all come together in the baby's nursery.

I had two projects to create, an ocean themed mobile and remake a musical mobile with bears to an ocean inspired one. I usually design my own patterns but I had been seeing the sweetest mobiles with patterns on Etsy. I used a mix of two patterns. One from Wool & Pine and the second from the Felty Chick. Both came with full patterns and very thorough tutorial with photos. Now wool felt was suggested to use in creating the creatures but my go to is always Kunin Felt. (Available at most major retailers.) 

I used Ocean Blue, Ivory and Mint Green I also enlarged the star fish for the second project. Floss, polyfil and felt is all you need. I did add smiley faces to the musical mobile starfish and enlarged them by fifty percent. Everyone should wake up to a smile! 

Here is the completed mobile hanging from an embroidery hoop, 12" diameter. I added wool balls for balance. 

Here is a close up of the adorable sleepy whale, the center piece of the mobile. The other pieces had to balance in weight around the outside. I helped hanging it from a light fixture to string together. 

This is the middle of the remake of the bear mobile adding the happy starfish. I also covered the center decal with a starfish applique. 

Enlarging the whale pattern again I made a stuffie for her shelf and to play with later on. Such a calm serene nursery for a sweet baby girl! 

Be inspired by some other Ocean Inspired crafts from Team Creative Crafts! 
(Link on Home Page
Thanks for stopping by!
Debra

Posted by: Debra Quartermain AT 12:22 pm   |  Permalink   |  0 Comments  |  Email
Wednesday, March 29 2023

Time for the monthly round up of fun fabulous crafts with Team Creative Crafts! Doubly excited because Felt is the medium for all the crafty projects! I made a trio of felt carrots for my farmhouse table spring centerpiece. So easy to make from a craft cut of Kunin Felt!

You will need:
9" x 12" craft cuts of Kunin ClassicFelt: Copper Canyon, Olive
(1 craft cut of each color will make two 12" carrots)
Polyfil from Fairfield World
Matching thread and needle
Adhesive
Sewing machine or hand sew or glue
Ruler, pencil and scissors
 

Cut the 9" x 12" craft cut in half. 

Fold one half craft cut in half again.  Line up ruler from outside edge at top to center folded point at bottom. Draw a line. Do not cut. Sew along the pencil line. Trim close to stitching.  TIP: It is much easier to sew smaller felt shapes first and then cut around. 

Turn carrot inside out. Stuff.

Fold Olive craft cut in half and free hand cut stopping at 3/4" from center. Open flat and cut down center to make two tops. Roll from one end and glue.  

Stitch around top of carrot. Insert top with some glue and pull stitches tight. Secure stitches but leave thread attached. 

Take needle down through top coming out at different points on carrot to make a stitch and pull thread slightly to indent. Secure at back of carrot.

Tie with a ribbon, add to a basket or hang individually! Now check out what the rest of Team Creative Crafts made with Felt! So many great projects! Link on Home Page.

Posted by: Debra Quartermain AT 07:02 pm   |  Permalink   |  0 Comments  |  Email
Tuesday, September 27 2022

Do you love Halloween parties? I sure do especially for the grandlittles and family. They love a party craft and this No Sew Baby Bat Sock Stuffie is a fun easy craft for a group. Makes a perfect party favor to go home with. Let's get this DIY party started with a group of talented bloggers hosted by my friends at Team Creative Crafts!

You will need:

Black ankle sock (1 per bat) 
9" x 12" craft cuts of Kunin Brand Classic Felt: 1 Black, 1 Purple or Violet, Orange Scrap
Fairfield World Poly-fil
1 Pair safety eyes (for young children) or wiggly eyes, buttons or paint
2 Chenille stems 
Tulip Scribbles paint: white, yellow
Adhesive: Tacky Glue for the littles (with an adult or two helping, using hot glue to adhere the larger pieces like the wings)
Needle and thread or elastic, scissors
Printable Bat Wing, Ear and Feet Pattern

STEP 1

Print out pattern, cut out pieces.  Cut from black; 2 feet, 1 outer wing and two ears. Cut from purple two inner ears and 1 wing. Trim these 1/8" of an inch smaller all the way around.

STEP 2

Flatten sock and use chalk to mark eye placement. (If you have a large group of younger ones, affix safety eyes before the party)
Make a tiny hole, insert eye shaft and reaching inside insert back firmly. Repeat for second eye. If using other types of eyes like buttons or wiggly eyes these can be applied near the end.

STEP 3

Stuff! Socks are stretchy so stuff gently or not. (I prefer Fairfield World Polyfil as it is soft and easy to work with.) Bats can be all different sizes too! (TIP: give the kids a premeasured amount of stuffing and that will keep the bat size within a certain size so the wings show.)

I did sew the bottom shut but black hair elastics work as well. Just tuck extra sock at bottom into center.

Place an elastic around the neck to make a cute head ball. 

STEP 4

Align inner ears on outer ears and glue together. Pinch centers slightly. Glue to top of back of head as shown.

STEP 5

Twist two chenille stems together and glue to center of outer wing. (This will allow wings to be shaped.) Place inner wing over top and glue in place.

STEP 6

Add a line of adhesive to center of wing on inside and firmly press back of bat into the glue.  Glue feet on bottom.

STEP 7

As the puffy paint needs drying time finishing the face at the end is the easiest way to finish the bats. Make a smile with the white and then add a line on each end pulling into triangles for teeth. Add a thin line around edge of the safety eyes. Like every crafty project allow for individual expression and some bats may have three eyes or teeth. Let the kids decide!

Set the bats aside to dry. Clip them upside down to a tree branch for added party decor. If drying time needs to be hastened, warm air or a hair dryer will work. 

Thanks for stopping by to check out my No Sew Baby Bat Sock Stuffie! Please hop along with the button below to see all of the Halloween party inspo and enter the Rafflecopter giveaway! 

Follow me on IG @debraquartermain where I am always "Making and Celebrating Heart, Home and Holidays" everyday!

Posted by: Debra Quartermain AT 08:42 pm   |  Permalink   |  0 Comments  |  Email
Thursday, July 28 2022

It is all about rainbows and love! Here  is my magical rainbow dinosaur stuffie filled with love!  This How to Make a Felt Rainbow Dinosaur Stuffie is perfect for a Back pack tag a long! It is filled with love as the rainbow plates along his back are actually hearts. He is definitely stuffed with love and Premium Poly-fil from Fairfield World. 

Let's Make a Dinosaur Stuffie!

Download Dinosaur Pattern
Fairfield Poly-fil
2- 9" x 12" craft cuts of Kunin Felt: Lagoon or color of your choice
Scraps of felt for hearts
Chalk, fine marker, clips or pins, sharp scissors, fabric adhesive, sewing machine and matching thread or hand sew.

STEP 1

Die cut or free hand cut a variety of hearts. (I used Laura Kelly's Heart Die with Sizzix, I always cut a bunch of hearts at once as there are many projects that I like to use a heart.) Cut a smaller heart for the front.  Download pattern and cut out. Trace pattern on to one piece of felt.

STEP 2

Cut around first dinosaur shape roughly.  TIP: It is easier to sew small felt pieces when you have extra felt around the pattern piece. Place on second piece of felt and cut around shape roughly. 

STEP 3

To add the heart plates along the back. Trim close to the pattern line and then insert hearts as shown. 

STEP 4

Use sewing machine or hand stitch completely around dinosaur, 1/8"  to 1/4" in from pattern line. Trim off line if you have used a black marker making sure to remove all black.  (An invisible marker or chalk are good choices for drawing patterns.)

STEP 5

Many stuffie patterns suggest leaving an opening and stuffing the piece and then sewing shut. I use that method but often for smaller stuffies that have an added detail like the heart. I find this method easier. Just cut a small slit where the detail goes.

STEP 6

Stuff.  Simply glue detail, the heart over the small opening. Ta Da!  Your dinosaur stuffie is complete!

I hope you are inspired to Make a Felt Dinosaur Rainbow Stuffie! 

Having fun sharing rainbows with Team Creative Crafts! 

Creatively yours!

IG @debraquartermain

Posted by: Debra Quartermain AT 08:00 am   |  Permalink   |  2 Comments  |  Email
Thursday, July 07 2022
DIY Harry Potter Flying  Broom

Our family loves Harry Potter and recently we had a Harry Potter themed birthday party for the grandlittle girls. The hit of the party was the DIY Harry Potter Flying Broom! I made a few and the kids were "flying" all over the yard. I am excited to share how easy they are to make and share a lot of amazing Harry Potter crafts with a group of talented bloggers put together by Team Creative Crafts! 

The Harry Potter themed party was held outdoors and the tent was transformed into a castle. The photo booth was filled with fun props and decor. Everyone was wearing HP glasses, adding a felt scarf and grabbing a broom! 


Let's make a DIY Harry Potter Flying Broom!

Kunin® Premium Felt 9” x 18" Craft Cut – Walnut

A stick or dowel-approximately 3'

Twine

Hot glue

Ruler and Scissors

Measure and cut 1/2" strips lengthwise leaving 4" uncut along top edge. 


Place felt with uncut top end around stick. If you line up cut ends with stick bottom, the broom will stand nicely. Glue edge  in place. Continue rolling and glue end. Glue a couple of the cut strips to stick. 


Tie twine tightly around stick approximately 1"- 2" from felt edge. Wind twine until you sre happy with the look and glue. 


These DIY Harry Potter Flying Brooms are so fast and easy. Kunin Felt Brand Premium is super sturdy and weather resistant so it will hold up to a lot of flying. The grandlittle girls loved them! 


Using sticks gathered along the river with interesting crooks and smooth finish made the brooms even more authentic. 


More Harry Potter Crafts with these talented Bloggers! 

Laura of Me and My INKlings is sharing a Room of Requirement Sign. Located in Hogwarts Castle, it’s a room that can only be discovered by someone who is in need. Free SVG File included in tutorial.

Let Harry, Ron, and Hermione hold your place with a Magnetic Set of Bookmarks created byLaura of Laura’s Crafty Life. Click through to discover how to make them.

Show your Hogwarts House Colors with a colorful set of Harry Potter DIY Scrunchies. The full step-by-step tutorial can be found over at Smitha’s site, Smiling Colors.

Shani of Sunshine and Munchkins has created a Free Printable Patronus Fortune Teller. Let this game help you discover what your charm is based upon your happiest memories.

Download, print, and color Harry Potter Movie Night Printables featuring Hogsmeade Tickets and Gringott’s Coins that the kiddos can earn, then redeem. Designed by the clever Justine of Little Dove.

Erica from 5 Little Monsters always keeps us in stitches (LOL!) with her fabulous creations. Free this adorable Crocheted House Elf Dobby by gifting him a piece of clothing. Click through for the complete pattern.

Always remember that the Wand Chooses the Wizard with this cute Harry Potter Mug created by Chelly of We Can Make That. Get the Free SVG file on her website.

Beth of Creatively Beth is always on the lookout for cute Dollar Tree crafts, including these magical Harry Potter Flying Keys. Easy to create with the free printable wing pattern sheet.

These yummy Chocolate Frog Earrings look good enough to eat, but don’t because they are made out of resin. Lindsay from Artsy Fartsy Mama has the complete tutorial over on her blog.

Thanks for coming by, enjoy all the HP craftiness and there are awesome HP themed give aways too from Laura Kelly Designs and Team Creative Crafts. Rafflecopter entry on my Home page here. 


Posted by: Debra Quartermain AT 01:00 am   |  Permalink   |  0 Comments  |  Email
Thursday, January 20 2022
No Sew DIY 18

My grandlittle girls love the 18" dolls and yes so do I. We also are makers. So we had lots of creative fun making the No Sew DIY 18" Doll Felt Poodle Skirt. Such an easy project  to decorate and personalize. The skirt is a basic circle but look how super cute these turned out! Great project for any doll lover. It can be resized to fit a smaller doll. Just cut a smaller circle. 

A little history about the skirt which I wore as a young girl too! In 1947 the poodle skirt or circle skirt was created by a singer and actress Julie Lynn Charlot, she had limited funds, her own unique sense of style and the holiday season had arrived. Her mother owned a factory that used felt. Without any sewing experience Juli DIYed herself a felt skirt with a pair of scissors. She cut a large circle, cut out the center for her waist and glued on some decorations. It was a hit at the party and began her going into business manufacturing the skirts. The iconic "poodle" design came later. 
 

Let's make the Skirt:
(1/2 yard of felt will make 2 skirts)
Kunin Felt Brand Classic or Premiumfelt: 
(Available at most major retailers and online)
Candy Pink, Lagoon and Red 
20" x 1" piece of felt for waistband
9" x  12" craftcuts Kunin Felt Brand in complimentary colors 
1 1/4 yards of trim for each skirt, ric rac, pom pom, fringe (Trims by the Yard has a great selection)
Assorted Buttons
1 Hook and Loop Circle or Snap
Circle Template 15" (I used a lampshade) 
Adhesive, scissors, ruler, pencil; Optional pinking shears, flower diecuts
 

STEP 1:

Draw a 15" circle on the felt. Cut. Fold in half and cut to center. Cut a 2.5" to 3" circle out of center. (Depending on brand of doll, the waist varies slightly, please measure doll.) Cut an 18" by 1" waistband, plain or with decorative scissors. 

-

STEP 2:

Leave 1 1/2" beyond the circle waist and glue waistband as shown. Slightly pleat as you go. For younger children this step can be done ahead and hot glue works great for this step. Trim the opposite end at 1 1/2" beyond waist. Try on doll. Fold the extended ends under to overlap. Remove from doll. 

STEP 3:

Glue the folded ends under. Adhere hook and loop to either side of ends. You can also use a snap tool as shown below. (For younger children the hook and loop would be easier. (Also note my first skirt has some messy excess glue on back. I trimmed some off carefully. It is not visible from the front so do not be too concerned with the back of waistband.)

Another fun fact and still true today. "The skirt proved most popular with teenage girls, and in 1952 mail-order catalogs dedicated to poodle skirts were made. Known as the "first teenage fashion trend ", these skirts were perfect for dancing. It could also be said that the skirt's ability to be customized led to its success with teenagers, as it reflected individual personalities."

STEP 4:

The best part, decorating! Trims, felt flowers, buttons and felt scraps were placed on the table, scissors and adhesive. Tacky glues will take a few minutes to dry. As you can see the girls had a lot of fun and each very creative in their styling of their skirt.

This is a great project to decorate as it can be laid flat. Of course with Valentine's Day around the corner there is a Valentine version too. 
 

Each skirt is unique.  The dolls are going to need a skirt for every holiday. 

The skirts are simple to put on and off and fun to style. These dolls are accessorized from the wardrobe stash. Those boots! 

There is a lot of Valentine activity happening! Such fun crafting with the grandlittle girls and putting together some kits to go out to some other little girls too! 


Have fun making this No Sew DIY Felt Poodle Skirt. Great to share and pop in the mail to a special someone! 
If you want to follow this Magical Mimi on IG @debraquartermain.


Posted by: Debra Quartermain AT 01:49 pm   |  Permalink   |  0 Comments  |  Email
Tuesday, December 07 2021
Foxy Slumber Lumbar Plush Pillow

Who doesn't love a Pillow Party and I am so pleased to be part of Fairfield World's 2021 Pillow Party featuring the Lumbar Pillow. What is a pillow party without creative blogger friends joining in! There is a Giveaway too! A $100 JOANN Gift Card and 10 lbs of Poly-fil from Fairfield World. Rafflecopter entry above. Meet my Foxy Slumber Lumbar Plush Pillow! The cover is super cozy plush and the Lumbar pillow inside makes it so comfortable! (Design and comments are mine, I received product to review. ) co=host for the Pillow Party is Laura Kelly! 

This is such an easy pillow cover to make, an envelope pillow style which can be sewn or glued with a fabric adhesive. 
You will need:
Pattern

Premier Lumbar Pillow Insert by Fairfield World
1 yard of Kunin Plush Felt: Pumpkin or Honey, Cashmere Tan
1/4 yard of Kunin Plush: Antique White or White
9" x 12" craft cut Kunin Classic or PrestoFelt: 1 Black
Fabric Adhesive
Scissors, paper plate, measuring tape, sewing machine optional, paper


STEP 1:
Cut pillow piece 28" by 36". From second piece of plush folded, place paper plate along fabric as shown. It should be in about 8" from edge. Draw along plate curve.

STEP 2:
Lift plate up and move so upper curve is as shown. Draw along outer edge of plate. Lift plate again. The width of the curved drawn piece should be about 7". With plush left folded. Cut just inside drawn lines making the two oval face pieces. 

STEP 3:
Print out pattern and cut out pattern pieces as shown, two innner ears, two outer ears, two sleeping eyes, one nose.

STEP 4:
Along the 28" of plush felt glue or sew a 1" hem. Fold plush felt piece wrong side out overlapping the two long ends with the folded finished edge on the inside. The pillow should measure 14" by 28". Clip sides. Sew or glue along short sides. TIP: When gluing lift the inner edges to glue both layers down. Leave clamps until dried thoroughly. 

STEP 5:
Turn pillow right side out. Smooth and flip over. Make sure plush nap is smooth and in a downward direction for front.

STEP 6:
Glue ear pieces together, center equally from each outside edge with 4" between them. Glue face pieces in place as shown.

STEP 6: 
Adhere nose and sleeping eyes. If using PrestoFelt, you just have to peel off backing. It is easy to use for small pieces as the pattern can be drawn on paper backing.

STEP 7: 
Adjust Lumbar Pillow Insert by simply unzipping and removing some poly-fil if desired or try pillow out first and adjust later. Insert pillow easily into plush envelope back. 

Cuddle up with with your Foxy Slumber Lumbar Plush Pillow, a warm throw, hot beverage and GET COZY! Enjoy relaxing and checking out all of the wonderful pillow ideas, enter the Give Away and then maybe take a nap. ZZZZZ 

Thank you for coming by! 


Posted by: Debra Quartermain AT 10:00 pm   |  Permalink   |  2 Comments  |  Email

Facebook
LinkedIn
Add to favorites
Twitter
" "
Debra Quartermain Design

 Magical Mimi to Grandlittles, I love to create, decorate & celebrate. Sharing  joy and inspiration from our 200 year old home, Quartermain House B&B on the east coast of Canada.

" "
Facebook
LinkedIn
Add to favorites
Twitter
    Sign Guest Book  View Guest Book 

    Debra Quartermain Design
    Fredericton, NB
    Canada
    Web Design Debra Quartermain
    Illustration Deborah Peyton
    Content copyright Debra Quartermain
    Email: debraq53@gmail.com

    Design Your Own Website, Today!
    iBuilt Design Software
    Give it a try for Free